
is now in public beta!
Published on: December 19, 2017
15 min read
How GitLab switched to Headless Chrome for testing
A detailed explanation with examples of how GitLab made the switch to headless Chrome.

GitLab recently switched from PhantomJS to headless Chrome for both our frontend tests and our RSpec feature tests. In this post we will detail the reasons we made this transition, the challenges we faced, and the solutions we developed. We hope this will benefit others making the switch.
We now have a truly accurate way to test GitLab within a real, modern browser. The switch has improved our ability to write tests and debug them while running them directly in Chrome. Plus the change forced us to confront and clean up a number of hacks we had been using in our tests.
Switching to headless Chrome from PhantomJS: background
PhantomJS has been a part of GitLab's test framework for almost five years. It has been an immensely useful tool for running browser integration tests in a headless environment at a time when few options were available. However, it had some shortcomings:
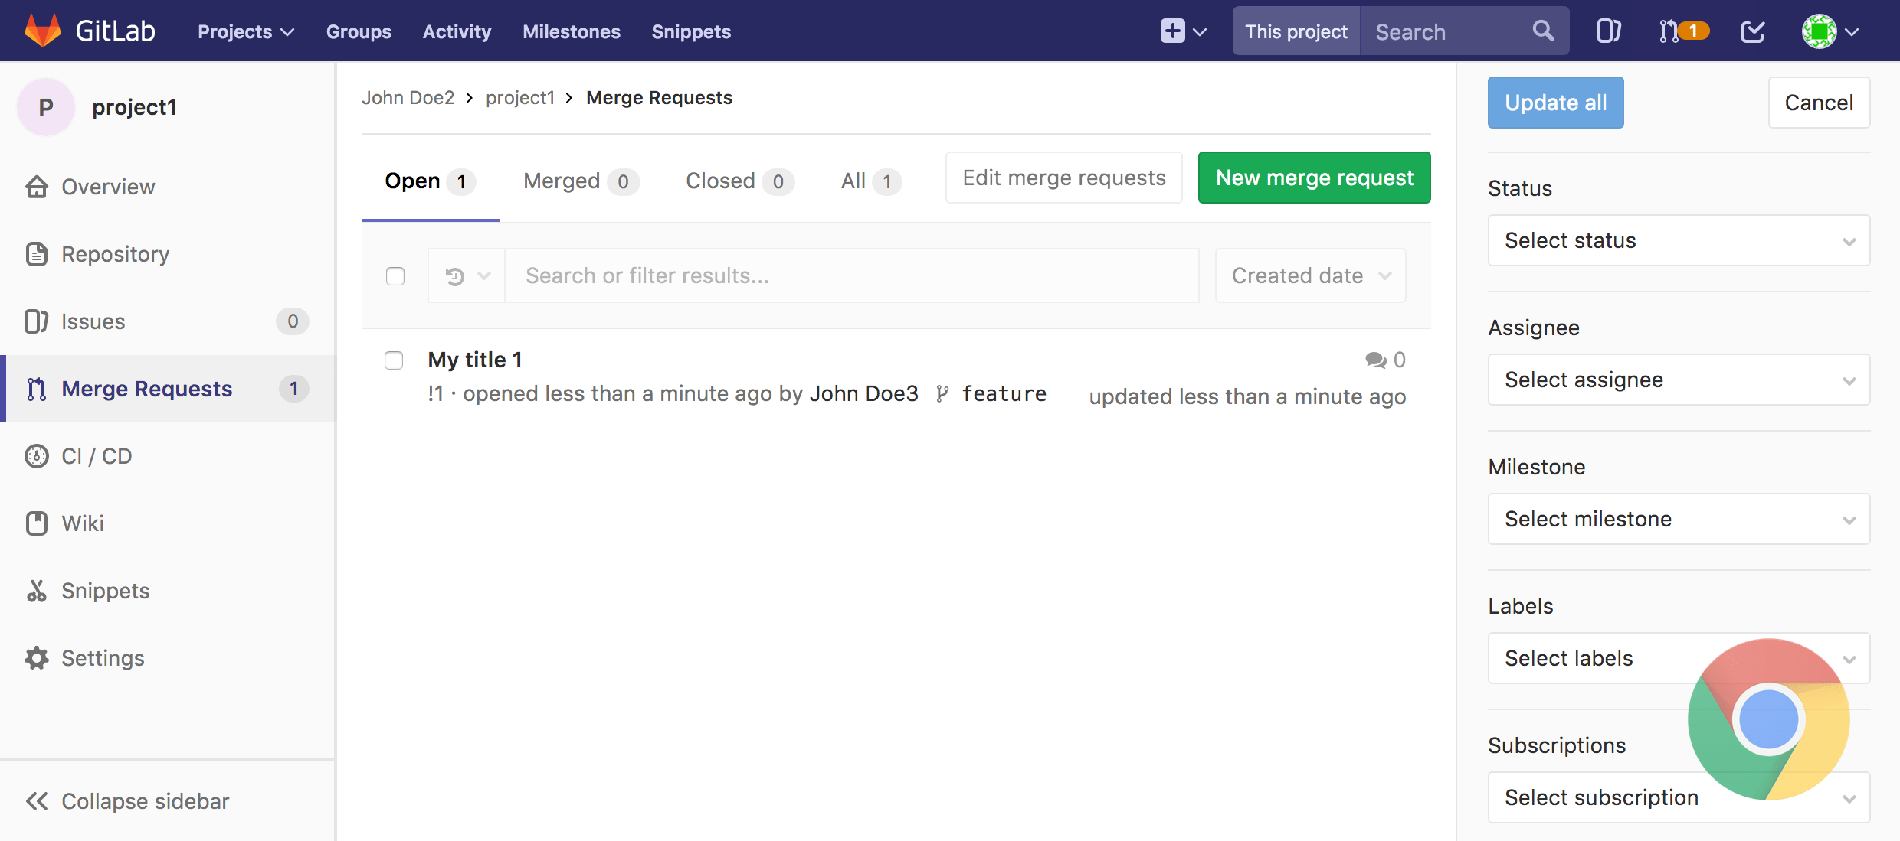
The most recent version of PhantomJS (v2.1.1) is compiled with a three-year-old version of QtWebKit (a fork of WebKit v538.1 according to the user-agent string). This puts it on par with something like Safari 7 on macOS 10.9. It resembles a real modern browser, but it's not quite there. It has a different JavaScript engine, an older rendering engine, and a host of missing features and quirks.
At this time, GitLab supports the current and previous major release of Firefox, Chrome, Safari, and Microsoft Edge/IE. This puts PhantomJS and its capabilities somewhere near or below our lowest common denominator. Many modern browser features either do not work, or require vendor prefixes and polyfills that none of our supported browsers require. We could selectively add these polyfills, prefixes, and other workarounds just within our test environment, but doing so would increase technical debt, cause confusion, and make the tests less representative of a true production environment. In most cases we had opted to simply omit them or hack around them (more on this later).
Here's a screenshot of the way PhantomJS renders a page from GitLab, followed by the same page rendered in Google Chrome:
 {: .shadow.center}
 {: .shadow.center}
You can see in PhantomJS the filter tabs are rendered horizontally, the icons in the sidebar render on their own lines, the global search field is overflowing off the navbar, etc.
While it looks ugly, in most cases we could still use this to run functional tests, so long as elements of the page remain visible and clickable, but this disparity with the way GitLab rendered in a real browser did introduce several edge cases.
What is headless Chrome
In April of this year, news spread that Chrome 59 would support a native, cross-platform headless mode. It was previously possible to simulate a headless Chrome browser in CI/CD using virtual frame buffer, but this required a lot of memory and extra complexities. A native headless mode is a game changer. It is now possible to run integration tests in a headless environment on a real, modern web browser that our users actually use!
Soon after this was revealed, Vitaly Slobodin, PhantomJS's chief developer, announced that the project would no longer be maintained:
This is the end - https://t.co/GVmimAyRB5#phantomjs 2.5 will not be released. Sorry, guys!
— Vitaly Slobodin (@Vitalliumm) April 13, 2017
It became clear that we would need to make the transition away from PhantomJS at some point, so we opened up an issue, downloaded the Chrome 59 beta, and started looking at options.
Frontend tests (Karma)
Our frontend test suite utilizes the Karma test runner, and updating this to work with Google Chrome was surprisingly simple (here's the merge request). The karma-chrome-launcher plugin was very quickly updated to support headless mode starting from version 2.1.0, and it was essentially a drop-in replacement for the PhantomJS launcher. Once we re-built our CI/CD build images to include Google Chrome 59 (and fiddled around with some pesky timeout settings), it worked! We were also able to remove some rather ugly PhantomJS-specific hacks that Jasmine required to spy on some built-in browser functions.
Backend feature tests (RSpec + Capybara)
Our feature tests use RSpec and Capybara to perform full end-to-end integration testing of database, backend, and frontend interactions. Before switching to headless Chrome, we had used Poltergeist which is a PhantomJS driver for Capybara. It would spin up a PhantomJS browser instance and direct it to browse, fill out forms, and click around on pages to verify that everything behaved as it should.
Switching from PhantomJS to Google Chrome required a change in drivers from
Poltergeist to Selenium and ChromeDriver.
Setting this up was pretty straightforward. You can install ChromeDriver on
macOS with brew install chromedriver and the process is similar on any given
package manager in Linux. After this we added the selenium-webdriver gem to
our test dependencies and configured Capybara like so:
      require 'selenium-webdriver'

Capybara.register_driver :chrome do |app|
  options = Selenium::WebDriver::Chrome::Options.new(
    args: %w[headless disable-gpu no-sandbox]
  )
  Capybara::Selenium::Driver.new(app, browser: :chrome, options: options)
end

Capybara.javascript_driver = :chrome
Google says the disable-gpu option is necessary for the time
being
until some bugs are resolved. The no-sandbox option also appears to be
necessary to get Chrome running inside a Docker container for GitLab's CI/CD
environment. Google provides a useful guide for working with headless Chrome
and Selenium.
In our final implementation we changed this to conditionally add the headless
option unless you have CHROME_HEADLESS=false in your environment. This makes
it easy to disable headless mode while debugging or writing tests. It's also
pretty fun to watch tests execute on the browser window in real time:
      export CHROME_HEADLESS=false
bundle exec rspec spec/features/merge_requests/filter_merge_requests_spec.rb
 {: .shadow.center}
What is the differences between Poltergeist and Selenium?
The process of switching drivers here was not nearly as straightforward as it was with the frontend test suite. Dozens of tests started failing as soon as we changed our Capybara configuration, and this was due to some major differences in the way Selenium/ChromeDriver implemented Capybara's driver API compared to Poltergeist/PhantomJS. Here are some of the challenges we ran into:
- JavaScript modals are no longer accepted automatically
We often use JavaScript `confirm("Are you sure you want to do X?");` click
      events when performing a destructive action such as deleting a branch or
removing a user from a group. Under Poltergeist a `.click` action would
automatically accept modals like `alert()` and `confirm()`, but under
Selenium, you now need to wrap these with one of `accept_alert`,
`accept_confirm`, or `dismiss_confirm`. e.g.:

```ruby
# Before
page.within('.some-selector') do
  click_link 'Delete'
end

# After
page.within('.some-selector') do
  accept_confirm { click_link 'Delete' }
end
```
- Selenium
Element.visible?returns false for empty elements
If you have an empty `div` or `span` that you want to access in your test,
      Selenium does not consider these "visible." This is not much of an issue
unless you set `Capybara.ignore_hidden_elements = true` as we do in our
feature tests. Where `find('.empty-div')` would have worked fine in
Poltergeist, we now need to use `visible: :any` to
select such elements.

```ruby
# Before
find('.empty-div')

# After
find('.empty-div', visible: :any)
# or
find('.empty-div', visible: false)
```

More on [Capybara and hidden elements](https://makandracards.com/makandra/7617-change-how-capybara-sees-or-ignores-hidden-elements).
- {:#trigger-method} Poltergeist's
Element.trigger('click')method does not exist in Selenium
In Capybara, when you use `find('.some-selector').click`, the element you
are clicking must be both visible and unobscured by any overlapping
element. Situations where links could not be clicked would sometimes occur
with Poltergeist/PhantomJS due to its poor CSS support sans-prefixes.
Here's one example:
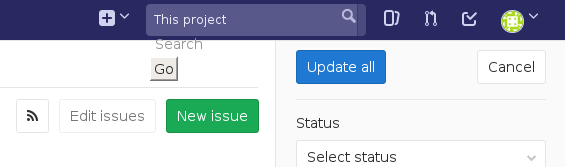
The broken layout of the search form here was actually placing an invisible
element over the top of the "Update all" button, making it unclickable.
Poltergeist offers a `.trigger('click')` method to work around this.
Rather than actually clicking the element, this method would trigger a DOM
event to simulate a click. Utilizing this method was a bad practice, but
we ran into similar issues so often that many developers formed a habit
of using it everywhere. This began to lead to some lazy and sloppy test
writing. For instance, someone might use `.trigger` as a shortcut to click
on an link that was obscured behind an open dropdown menu, when a properly
written test should `.click` somewhere to close the dropdown, and _then_
`.click` on the item behind it.
Selenium does not support the `.trigger` method. Now that we were using a
more accurate rendering engine that won't break our layouts, many of these
instances could be resolved by simply replacing `.trigger('click')` with
`.click`, but due to some of the bad practice uses mentioned above, this
didn't always work.
There are of course some ways to hack a `.trigger` replacement. You could
simulate a click by focusing on an element and hitting the "return" key,
or use JavaScript to trigger a click event, but in most cases we decided to
take the time and actually correct these poorly implemented tests so that a
normal `.click` could again be used. After all, if our tests are meant to
simulate a real user interacting with the page, we should limit ourselves
to the actions a real user would be expected to use.
```ruby
# Before
find('.obscured-link').trigger('click')
# After
# bad
find('.obscured-link').send_keys(:return)
# bad
execute_script("document.querySelector('.obscured-link').click();")
# good
# do something to make link accessible, then
find('.link').click
```
Element.send_keysonly works on focus-able elements
We had a few places in our code where we would test out our keyboard
      shortcuts using something like `find('.boards-list').native.send_keys('i')`.
It turns out Chrome will not allow you to `send_keys` to any element that
cannot be "focused", e.g. links, form elements, the document body, or
presumably anything with a tab index.

In all of the cases where we were doing this, triggering `send_keys` on the
body element would work since that's ultimately where our event handler was
listening anyway:

```ruby
# Before
find('.some-div').native.send_keys('i')

# After
find('body').native.send_keys('i')
```
Element.send_keysdoes not support non-BMP characters (like emoji)
In a few tests, we needed to fill out forms with emoji characters. With
      Poltergeist we would do this like so:

```ruby
# Before
find('#note-body').native.send_keys('@💃username💃')
```

In Selenium we would get the following error message:

```
Selenium::WebDriver::Error::UnknownError:
    unknown error: ChromeDriver only supports characters in the BMP
```

To work around this, we added [a JavaScript method to our test bundle that
would simulate input and fire off the same DOM events](https://gitlab.com/gitlab-org/gitlab-ce/blob/a8b9852837/app/assets/javascripts/test_utils/simulate_input.js)
that an actual keyboard input would generate on every keystroke, then
wrapped this with a [ruby helper](https://gitlab.com/gitlab-org/gitlab-ce/blob/a8b9852837/spec/support/input_helper.rb)
method that could be called like so:

```ruby
# After
include InputHelper

simulate_input('#note-body', "@💃username💃")
```
- Setting cookies is much more complicated
It's quite common to want to set some cookies before `visit`ing a page that
      you intend to test, whether it's to mock a user session, or toggle a
setting. With Poltergeist, this process is really simple. You can use
`page.driver.set_cookie`, provide a simple key/value pair, and it will just
work as expected, setting a cookie with the correct domain and scope.

Selenium is quite a bit more strict. The method is now
`page.driver.browser.manage.add_cookie`, and it comes with two caveats:

- You cannot set cookies until you `visit` a page in the domain you intend
  to scope your cookies to.
- Annoyingly, you cannot alter the `path` parameter (or at least we could
  never get this to work), so it is best to set cookies at the root path.

Before you `visit` your page, Chrome's url is technically sitting at
something like `about:blank;`. When you attempt to set a cookie there, it
will refuse because there is no hostname, and you cannot coerce one by
providing a domain as an argument. The [Selenium
documentation](http://docs.seleniumhq.org/docs/03_webdriver.jsp#cookies)
suggests that you do the following:

> If you are trying to preset cookies before you start interacting with a
> site and your homepage is large / takes a while to load, an alternative is
> to find a smaller page on the site (typically the 404 page is small, e.g.
> `http://example.com/some404page`).

```ruby
# Before
before do
  page.driver.set_cookie('name', 'value')
end

# After
before do
  visit '/some-root-path'
  page.driver.browser.manage.add_cookie(name: 'name', value: 'value')
end
```
- Page request/response inspection methods are missing
Poltergeist very conveniently implemented methods like `page.status_code`
      and `page.response_headers` which are also present in Capybara's default
`RackTest` driver, making it easy to inspect the raw response from the
server, in addition to the way that response is rendered by the browser. It
also allowed you to inject headers into the requests made to the server,
e.g.:

```ruby
# Before
before do
  page.driver.add_header('Accept', '*/*')
end

it 'returns a 404 page'
  visit some_path

  expect(page.status_code).to eq(404)
  expect(page).to have_css('.some-selector')
end
```

Selenium does not implement these methods, and [the authors do not intend
to add support for them](https://github.com/seleniumhq/selenium-google-code-issue-archive/issues/141#issuecomment-191404986),
so we needed to develop a workaround. Several people have suggested running
a proxy alongside ChromeDriver that would intercept all traffic to and from
the server, but this seemed to us like overkill. Instead, we opted to
create a [lightweight Rack middleware](https://gitlab.com/gitlab-org/gitlab-ce/blob/a8b9852837/lib/gitlab/testing/request_inspector_middleware.rb)
and a corresponding [helper class](https://gitlab.com/gitlab-org/gitlab-ce/blob/a8b9852837/spec/support/inspect_requests.rb)
that would intercept the traffic for inspection. This is similar to our
[RequestBlockerMiddleware](https://gitlab.com/gitlab-org/gitlab-ce/blob/master/lib/gitlab/testing/request_blocker_middleware.rb)
that we were already using to intelligently `wait_for_requests` to complete
within our tests. It works like this:

```ruby
# After
it 'returns a 404 page'
  requests = inspect_requests do
    visit some_path
  end

  expect(requests.first.status_code).to eq(404)
  expect(page).to have_css('.some-selector')
end
```

Within the `inspect_requests` block, the Rack middleware will log all
requests and responses, and return them as an array for inspection. This
will include the page being `visit`ed as well as the subsequent XHR and
asset requests, but the initial path request will be the first in the array.

You can also inject headers using the same helper like so:

```ruby
# After
inspect_requests(inject_headers: { 'Accept' => '*/*' }) do
  visit some_path
end
```

This middleware should be injected early in the stack to ensure any other
middleware that might intercept or modify the request/response will be
seen by our tests. We include this line in our test environment config:

```ruby
config.middleware.insert_before('ActionDispatch::Static', 'Gitlab::Testing::RequestInspectorMiddleware')
```
- Browser console output is no longer output to the terminal
Poltergeist would automatically output any `console` messages directly into
      the terminal in real time as tests were run. If you had a bug in the frontend
code that caused a test to fail, this feature would make debugging much
easier as you could inspect the terminal output of the test for an error
message or a stack trace, or inject your own `console.log()` into the
JavaScript to see what is going on. With Selenium this is sadly no longer the
case.

You can, however, collect browser logs by configuring Capybara like so:

```ruby
capabilities = Selenium::WebDriver::Remote::Capabilities.chrome(
  loggingPrefs: {
    browser: "ALL",
    client: "ALL",
    driver: "ALL",
    server: "ALL"
  }
)

# ...

Capybara::Selenium::Driver.new(
  app,
  browser: :chrome,
  desired_capabilities: capabilities,
  options: options
)
```

This will allow you to access logs with the following, i.e. in the event of
a test failure:

```ruby
page.driver.manage.get_log(:browser)
```

This is far more cumbersome than it was in Poltergeist, but it's the best
method we've found so far. Thanks to [Larry Reid's blog post](http://technopragmatica.blogspot.com/2017/10/switching-to-headless-chrome-for-rails_31.html)
for the tip!
Results
Regarding performance, we attempted to quantify the change with a non-scientific analysis of 10 full-suite RSpec test runs before this change, and 10 more runs from after this change, factoring out any tests that were added or removed between these pipelines. The end result was:
Before: 5h 18m 52s After: 5h 12m 34s
A savings of about six minutes, or roughly 2 percent of the total compute time, is statistically insignificant, so I'm not going to claim we improved our test speed with this change.
What we did improve was test accuracy, and we vastly improved the tools at our
disposal to write and debug tests. Now, all of the Capybara screenshots
generated when a CI/CD job fails look exactly as they do on your own browser
rather than resembling the broken PhantomJS screenshot above. Inspecting a
failing test locally can now be done interactively by turning off headless
mode, dropping a byebug line into the spec file, and watching the browser
window as you type commands into the prompt. This technique proved extremely
useful while working on this project.
You can find all of the changes we made in the original merge request page on GitLab.com.
What are some additional uses for headless Chrome?
We have also been utilizing headless Chrome to analyze frontend performance, and have found it to be useful in detecting issues.
We'd like to make it easier for other companies to embrace as well, so as part of the upcoming 10.3 release of GitLab we are releasing Browser Performance Testing. Leveraging GitLab CI/CD, headless Chrome is launched against a set of pages and an overall performance score is calculated. Then for each merge request the scores are compared between the source and target branches, making it easier detect performance regressions prior to merge.
Acknowledgements
I sincerely hope this information will prove useful to anybody else looking to make the switch from PhantomJS to headless Chrome for their Rails application.
Thanks to the Google team for their very helpful documentation, thanks to the many bloggers out there who shared their own experiences with hacking headless Chrome in the early days of its availability, and special thanks to Vitaly Slobodin and the rest of the contributors to PhantomJS who provided us with an extremely useful tool that served us for many years. 🙇
We want to hear from you
Enjoyed reading this blog post or have questions or feedback? Share your thoughts by creating a new topic in the GitLab community forum.
Share your feedback